Instancing Basics
Understanding how instancing works and why it's powerful
What are Instances
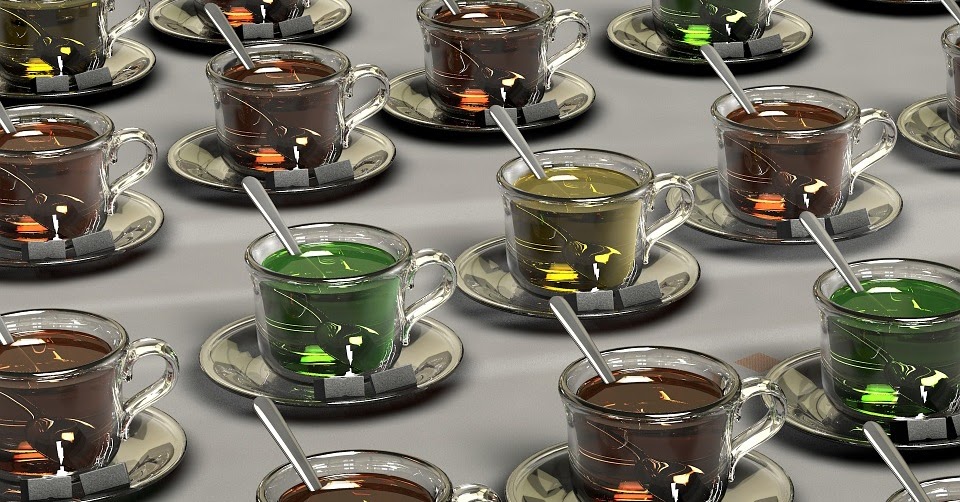
Scattering is based on the technology of instancing! What is instancing? Well, instancing is the idea of re-using the data of your object in your computer memory in order to vastly save on memory and performance.
Instancing is a powerful technique that allows you to reuse the same geometry multiple times without duplicating the actual mesh data. Instead of creating separate copies of an object (which consumes memory for each copy), instancing references the original geometry and only stores transformation data (position, rotation, scale) for each instance.
Blender Instancing
Geo-Scatter uses Blender's native Geometry Node instancing engine, which provides the same high-performance implementation for both Cycles and Eevee render engines. This means you get consistent, optimized rendering regardless of which engine you choose. Same for external render engines such as Octane or V-ray. As long as GeometryNode instancing is supported, Geo-Scatter is supported as well.
Super Powerful
The primary advantage of instancing is its ability to handle massive numbers of instances efficiently. Since only one copy of the geometry data exists in memory, you can scatter thousands or even millions of objects while maintaining excellent performance and low memory usage. Each instance only stores its unique transformation data, making it incredibly memory-efficient compared to traditional duplication methods.
Found a Bug?
If you ever notice a high memory usage, it's likely a Blender bug, please contact us and we'll try to reproduce the issue and report it to the Blender developers.
Inst. vs Dupplis.
If you're familiar with Blender's duplication shortcuts, instancing is similar to ALT+D (linked duplicate) rather than CTRL+D (full duplicate). With ALT+D, all duplicates share the same mesh data—edit one, and all instances update. Instancing works similarly: all instances reference the same source geometry, making it perfect for scattering where you want consistent geometry but varied positions, rotations, and scales.
Limitations of Instancing
It is important to understand the implication of re-using the same mesh data, while it is giving us massive benefits in terms of performance, we will not be able to run a physics collision or wind simulation that will change the individual meshes of your objects. If you want to do so, you'll need to have unique objects with unique meshes.
Games & Instancing
"But games can do it! They can bend grass and trees along the player's path!" Ah yes! They can! And they do preserve the instancing principle too while doing so! The thing is that game engines use a rendering pipeline called 'Rasterization', and in this pipeline it is technically possible to very easily and efficiently deform triangles displayed within the GPU memory (called vertex-shading). Such technique does not exist in Ray-tracing pipelines (such as Cycles), so it's a no go for DCCs such as Blender, Maya or Houdini. It's exclusive to game engines!
Main Methods
First, let's define the lead instancing method
Available Method
You'll first need to choose your main instancing method from the dropdown menu. Currently, there are two options available:
- Objects: This is the classic instancing method where you'll scatter a list of Blender objects.
- None: This outputs the raw distribution point cloud without any geometry. Useful for debugging your distribution or when you want to use the points for other purposes (like driving particle systems or custom geometry nodes setups).
- Later: Later we might add more instancing methods, such as procedural geometry node instancing. Consider this dropdown as a placeholder for upcoming instancing innovations.

Add Instances
Assign or change the instances used by your scatter
Add Instances
The objects you use for the scatter are stored within the Geometry-node nodetree directly (using an Object Info node). You are able to add or remove instances from our interface, within the 3D Viewport N-panel > Geo-Scatter > Tweak > Instancing panel. All objects you are using will be listed within this interface.
Pro Tip
- The ALT key for batch operation is supported with the 'add new instance(s)' and 'remove instance' operations.
- Note that it is also possible to add linked-objects, or using Blender's collection-groups system!
Retrieve Instances
Retrieve the original instance geometry used by your scatter
Retrieve Instances
It is possible to easily retrieve any instance used by any scatter-system in your Blender scene. To do so, click on the select icon button, the instance will be selected in the viewport. If the instance is stored in a hidden collection in your outliner we will propose you to unhide the collection in question.
Pro Tip
- Press SHIFT to select many instances simultaneously.
- Press the ALT key to center the 3D view on the instance.
Show/Hide Instances
Easily filter out some instances from your scatter
Show/Hide Instances
Next to each instance in your scatter system, you'll find a checkbox that allows you to show or hide specific instances from the distribution. When you uncheck an instance, it will be removed from the scattering without affecting the current distribution seed, meaning the remaining instances will maintain their existing positions and arrangement.
Instancing Methods
Select an object instancing method, to define how objects are assigned to the distributed points
Advanced Instancing Methods
For most distribution methods, the instancing is always done at the end of
the scattering pipeline. First, the Geo-Scatter engine will distribute
points, then calculate the various features that can influence the point's
scale/rotation/density. Then, it will assign instance indexes to each point. The instancing is generally stable, and should not vary if the distribution changes in size.
Available Methods
You'll find here below the different instancing methods available.
Simple
This is the default and simplest instancing method. Points are randomly assigned to instances (based on the ID attribute of each point). You can change the seed to modify the random assignment pattern (same with other methods).
Probability Rate
Assign instances to available spots based on a rarity number per object. The higher the rarity number, the more common the object will be in the distribution. Objects with higher rarity values will have a greater probability of being selected for available spots.
Wand Button
The magic wand tool automatically assigns high rarity numbers to smaller object sizes, making smaller objects more common in the distribution by default.
Clusters
With this instancing method, you'll be able to assign Instances in "cluster" zones, aka zones with a the same instance's assigned next to each other depending on the cluster texture size. The Jitter factor can be used to create a more natural distribution, making the group transition less abrupt.
Grouping
You can group instances together in the same cluster area if they are assigned to the same grouping index. Make sure that no grouping indexes are left unassigned. If the max group index is 15, ensure all your instances are assigned from index 1 to 15, otherwise you'll create dead zones with nothing assigned (as the instancing grouping did not find instances to assign for that region).
Wand Button
The magic wand tool automatically assigns grouping indexes based on variant names, so that variant models are automatically assigned the same grouping index numbers.
Color Map
Assign instances based on an ID map. The color map can come either from a vertex-color data, from a texture-data, or from an image.
Grouping
Instances assigned to the same color will automatically be randomly assigned in the same color area.
Pro Tip
This method is great if you wish to have a single system distributing many objects, for better control I would advise using many scatters (or scatter groups) & assign each of these scatter layers to a color using a vertex color culling mask or a colorful pattern.
Wand Button
The magic wand tool automatically assigns random colors per instance based on variant names, so that variant models are automatically assigned the same colors, it will additionally automatically create a texture pattern with the colors if the pattern spot is empty.
Fit Scale
The Fit Scale instancing method assigns instances based on the scale attribute of distributed points. Each instance object is assigned to a scale value threshold, representing a height, a width radius, or an overall scale in XYZ. Instances will be assigned on points of the corresponding scaling attribute, therefore the best approach with this method is to use real world scale values when assigning scaling effects. (Ex: If your tallest tree is 3m tall, make sure the largest scaling attribute assigned is at least a value of 3.0).
Scaling Methods
There are 3 submethods available:
- Frozen Scale: All assigned instances will have a scale of 1.0
- Dynamic Scale: assigned instances scale will wiggle between the neighboring scale threshold values
- Original Scale: keep the original scale effect.
Note
In the video above, we set the default scale to the tallest scale value of our tree (1.58), then used a pattern effect to diminish the scale and density of our distribution. The scaling value changes, and the instances are automatically reassigned to the changing scale value. (Pro Tip: If using a pattern, reverse the density influence, that way the largest instance assigned will be in low density areas implicitly.)
Wand Button
The magic wand tool automatically assigns the ideal scale value per objects in meters.
Fit Space
The Fit Space instancing method picks an instance object depending on available space in the distribution. Each object will have their own assigned distance number, representing their ideal nearby space radius threshold. You may use the tolerance slider to adjust the precision of the assignment. A less tolerant value will introduce more randomness into the instance assignment.
Less Freedom
Because the instances are intrinsically influenced by the density of the distribution, adding for example, a density culling mask will automatically have an influence on the instances. This creates a double-edged sword, as the algorithmic automation might take some artistic control away from you.
Note
In the video above, we use a proximity effect to lower the distribution density near the cube, creating a more realistic spacing pattern.
Wand Button
The magic wand will automatically assign the ideal spacing value per objects in meters.
Manual Indexing
This method is specifically designed and exclusively available for manual distribution mode and is the heavily recommended instancing method when working in manual mode. Manual indexing gives you precise control over which instance appears at each manually placed point.
Physics Indexing
When using physics distribution mode, the Physics instancing method will be the sole instancing option available. This is a requirement as each placed object corresponds to a specific object from the rigid body simulation.
Individual Transforms
Need to edit a specific instance transform?
Individual Transforms
If you ever need to edit the precise transforms/random transforms of a specific instance from your list, this is the feature for you. You'll be able to change the default rotation, offset the position of your instance from a bad default origin, or apply a new default scale. This feature is great when dealing with linked objects.
Auto Setup
A few automatic setup operators are available, to batch randomize the transforms, or apply an automatic origin offset to all instances for example.
Limit Instance Overlapping
Prevent instances from overlapping with each other
Limit Overlap Option
If you wish to prevent instances from touching each other, this is an option for you. This feature uses the circular width of instances (calculated on the XY plane) to detect and prevent overlapping. You have several collision detection options available:
-
Self-Collision Detection: Prevents instances from overlapping with each other. You can adjust the tolerance level to allow some overlap if needed, and control the precision of the algorithm. Higher precision values provide more accurate results but slower computation. High tolerance means that some overlap will be tolerated and vice versa.
-
Border Collision: Removes instances whose widths extend beyond the borders of your distribution surfaces. This helps maintain clean edges and prevents instances from floating outside your intended area.
-
Mesh Collision: Detects collisions between instances and specific mesh objects from a chosen collection. This is useful when you want to prevent instances from intersecting with existing geometry in your scene.
Algorithm Randomness
When instances are prevented from overlapping, the system needs to decide which instances to keep and which to remove when a collision occurs. This process involves randomness: the algorithm randomly selects which conflicting instance to preserve therefore a seed option is also present to give you that extra level of control.
Performance Considerations
Keep in mind that collision detection can be computationally intensive, especially with large numbers of instances (over 100,000). The system will warn you when enabling collision detection on high-density scatters to help maintain real-time performance. Consider using a limit distance distribution option first.
Offloading Operation
Export instances to external .blend files for better performance
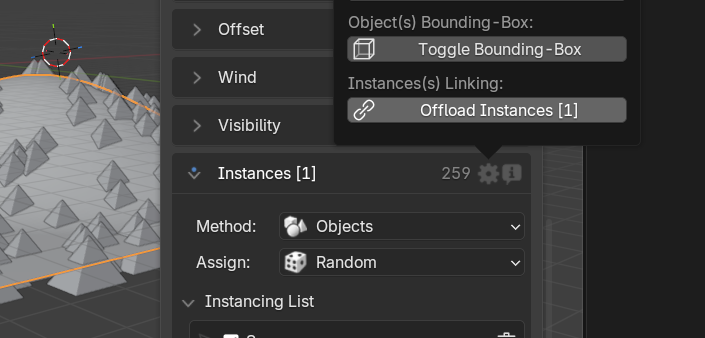
Offloading Operation
The offloading operation allows you to migrate (link) your instance objects stored in your current .blend to a new or existing .blend file.
If the .blend file already exists, the system will import the corresponding object in the file instead of creating a new one.
Offloading your instances to external .blend files (via linked data) will help you improve your overall project performance, especially for .blend files of more than 1GB in size. This feature is particularly useful when working with heavy scenes containing multiple high-poly scattered objects, Blender's CTRL + Z system tends to not work well with large multi-GB .blend files.
This feature is located in Tweak panel > Instancing > Gearwheel Header Menu.